Mounting an Amazon EFS File System Using IP address
I am a self taught Linux System Engineer with a strong background in Networking and Radio frequency technologies. I am currently working as a Cloud Support Engineer (Linux) and I love working with Open Source.
Overview
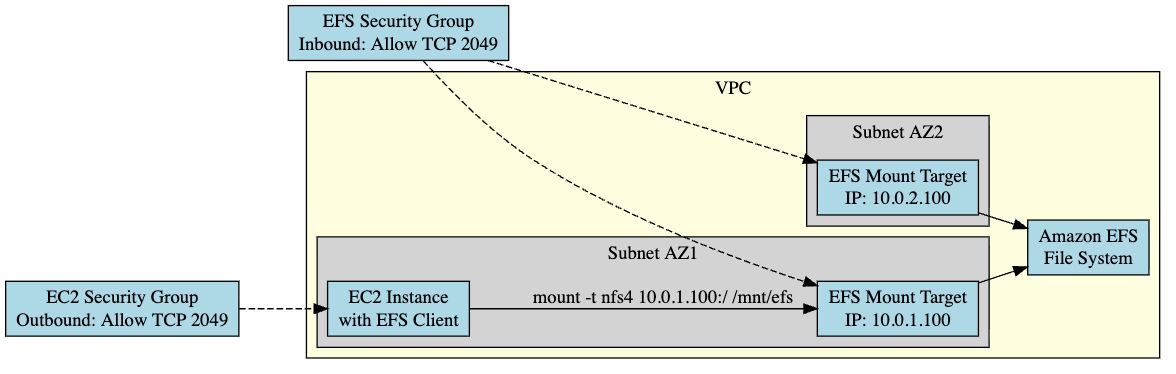
This lab guides you through mounting an Amazon Elastic File (EFS) on an EC2 instance using IP addresses. This approach is useful when DNS resolution isn’t available or when you need to mount to a specific mount target.
Prerequisites
An active AWS account
An Amazon EFS file system created in your account
An EC2 instance in the same VPC as your EFS file system
The amazon-efs-utils package installed on your EC2 instance
Security groups configured to allow NFS traffic (port 2049
Step 1 : Install the EFS Client
# For Amazon Linux, Amazon Linux 2, and RHEL |
sudo yum install -y amazon-efs-utils |
# For Ubuntu and Debian |
sudo apt-get update |
sudo apt-get -y install git binutils |
git clone https://github.com/aws/efs-utils |
cd efs-utils |
./build-deb.sh |
sudo apt-get -y install ./build/amazon-efs-utils*deb |
Step 2: Determine Your EFS Mount Target IP address
Open the AWS Management Console
Navigate to the EFS service
Select your file system
Click on the "Network" tab
Note the IP address for the mount target in your EC2 instance's Availability Zone
Step 3: Create a Mount Point Directory
sudo mkdir -p /mnt/efs
Step 4 : Mount the EFS File System Using IP address
Option A: Standard NFS Mount
|
Option B: Using the EFS Mount Helper (Recommended)
|
Replace:
MOUNT_TARGET_IP with the ip address noted in step 2
file-system-id with your EFS file system ID
Step 5: Verify the Mount
df -h | grep efs
Step 6: Configure Automatic Mount on Reboot (optional)
add an entry to the /etc/fstab
# Using standard NFS | |
| `echo "MOUNT_TARGET_IP:/ /mnt/efs nfs4 nfsvers=4.1,rsize=1048576,wsize=1048576,hard,timeo=600,retrans=2,noresvport 0 0" | sudo tee -a /etc/fstab` |
# OR using the EFS mount helper | |
| `echo "file-system-id:/ /mnt/efs efs _netdev,tls,mounttargetip=MOUNT_TARGET_IP 0 0" | sudo tee -a /etc/fstab` |
Step 7: Test File Operations
# Create a test file |
sudo touch /mnt/efs/test-file.txt |
sudo chmod 777 /mnt/efs/test-file.txt |
echo "This is a test file on Amazon EFS" > /mnt/efs/test-file.txt |
# Verify the file content |
cat /mnt/efs/test-file.txt |
Troubleshooting Tips.
Ensure your security groups allow NFS traffic (TCP port 2049)
Verify network connectivity between your EC2 instance and the mount target
Check that the mount target IP address is correct for your VPC and Availability Zone
If using the EFS mount helper with TLS, ensure the required certificates are available
Cleanup
# Unmount the file system |
sudo umount /mnt/efs |
# Remove the fstab entry if added |
sudo sed -i '/efs/d' /etc/fstab |
